Pages

Wednesday, February 26, 2014

The Wedding


Heyy! The wedding finally came! Like i told you in the previous post, one of my office fella is married!!
I finally made the actual wedding nails. I was so happy that i could make it. Hallelujah!
It was a rainy Sunday Morning in Bandung, and i had to make an early trip to Jakarta with make up, kebaya, songket, and high heels on!


Ooops i didn't show my clutch right


Nahh, i'm not ready to be captured yet
Introducing my little brother and please ignore my boyfriend inside the car
Windy Rooftop gave me a lovely photo


Say hi to the bridemaids :)


I spent most of my time taking pictures. Sadly, i didn't have much time to do my own nails. I just go with plain nails. Actually i had nail wraps on but it already had many scratches so i decided to put it off and go with plain nails. If i had time, probably i'd painted my nails purple or shocking pink.

Say Hello! to the Happy Couple Mba Nina and Mas Eko
My First Wedding Nails Customer
Mba Nina loved the nails. And so did i oh or let me say and so do i because until now, i still have that feeling for my wedding nails :D.

A Close-Up to the Nails
So what do you think? I think those nails just persuade me to get married soon so i can wear them hahahahha.

See you on the next post.

Bye!!

Ita


Sunday, February 23, 2014

My First Ever Wedding Nails

It's been a while since i opened my blogger page. I had like a big box of things to do this week. Tons of stories to be told actually but i just can't tell all of them, so i think it will be a wise decision to keep it only for myself. 
One of my office fella is going to be married this very weekend. Gosh, i couldn't believe that finally i have a wedding invitation, i mean usually i just accompany my mom or dad or my older cousin to attend a wedding. But now, it's me who is invited to a wedding. Can you believe it? Me can't.
I asked her whether she wanted to have her nails decorated on her wedding day. And she said yes! It was a small talk at first but then, considering her answer, i'm going to give it a try.
I started to make 2 example nails. Just to test my ability to make wedding nails. And, surprisingly, i love the result. Here in this post, i'll post some of my pictures wearing my (first) two wedding nails example. 


I use my Nail Art Accessories to do my experience. I chose my Pink Bow decoration that i bought in Pavilion Kuala Lumpur. There is a Nail Art Kit Store just beside Cotton On. Worth to visit!

Ignore my ugly face


Don't You Love My Ring Finger? Me Love It Too Much


Was Waiting at the Car Wash and Took Some Time to Pose :D


Aaaah so many picture i post here. Excuse my satisfaction of the result. I mean, it was my first time! And it wasn't look that bad, huh? And please ignore my messy silver nails. My silver nail polish are getting sticky so please give me a new one! Hahahaha just kidding.
Happy Sunday and don't forget to drop some comments!

Bye!
Take Care,
Ita

Saturday, February 15, 2014

Lovely Saturay Ride

Today is a full day with boyfie day. We went to Bogor this afternoon, and it was fun because finallyyy i got to eat Bakso!! Because my boyfie is not into Bakso, we went to P.I.A Apple Pie and he ended up eating omelette haha. Here, i'll post some of my selfie today snapped when i was feeling bored staring at the toll road :D


Gotta go to bed now, thank you for visiting my blog!

Take a good care!

Ita

Wednesday, February 12, 2014

Love, Kisses, and Presents

Hi everyone. What a tiring day. Actually i didn't do much at the office but i don't know i'm just exhausted and mmmm unhappy? I think i'm just being extra sensitive. Counting days to Valentine, i think i won't have any special Friday. I won't have any special Valentine dinner on a heli pad with my boyfriend nor have a little ride on a heli and watch Jakarta crazy traffic from above. In fact, probably i will spend my Valentine night in a traffic. Yes, i will go home this Friday yayy. 

So, Love, Kisses, and Presents? What is the word to describe those?? Yes, Valentine it is! I do extra Valentine designs on my nails tonight. Let's have a look!


Pink, Lips, Love, and Bow. OMG, i really love my nails. What about you? Okay, i'll give you the tutorial! (with pic this time hehehe)

I decided to keep the O.P.I I Lily Love You and the hourglass nail that i did before (but in the end, i took off my fake hourglass nail, ah we'll get there) . You can take a look at those nails hereFirst thing that came to my mind is the lip design. You can see the tutorial here .

So, let's start!

First, we'll do the lip design.
As usual, apply the mighty holy base coat on your nails before applying any polish on it. Oh, i use Color Club Stuck On You Base Coat 


It's quite hard to find Color Club in Jakarta well let's make it in the whole Indonesia. You can find it in C's Nail Academy in Jalan Kaji no.36 Jakarta Pusat.   


Those are what you need to make the lip design. I choose Revlon Fuchsia Fever for the lips. To make the lips, you can use the Big Dotting tools and make 2 dots for the upper lip and shape it into an upper lip, and for the bottom lip, you can make two side-by-side medium-sized dots. To make it even real, you can draw diagonal white lines on the lips using stripper brush. i'll show it.

Second, the Red Gems Love.
Ah, this is a very easy design!! First, paint your nail pink mm soft pink heehe. I use Color Club I Believe In Amour for the base color.


Stick the gems and make (a) love!!!


 I know some of you are wondering "hey, how can i do that? how to stick the gem? how to pick the gem easily?" Well, you need nail glue, and a "dipped in the base/top coat before" toothpick. Yes a toothpick. Put some top or base coat on your toothpick. It will ease you to pick the gems and place it on your nails. Trust me!


My Secret Weapon


Third, the Love!

I decided to have a half pink Love on my nail. So, i paint my nail white and draw a half pink Love on it!

Oh It's a Love already
1


Fill It


Finished! Oh Wait, my ring finger, mmm what Valentine-Word goes with my ring finger? I think it's going to be better if i change my ring finger design. Present! Wait, i won't make a "box design" on my ring finger. I will make something else, related to present. 

Fourth, a Bow, a crystal bow!

This is a very easy design. Just paint your nail pink, and stick a big Crystal Bow on your nail using a nail glue. and Walla!


So, what do you think? Me love it! Why don't you guys give it a try? It's quite easy. 
Well then, Happy Valentine to you all. I hope you have a pinky-brownie one :)

I'll see you on the next post!

Take Care,

Ita

Monday, February 10, 2014

Let's Call It.... My Valentine Nails. (O.P.I I Lily Love You Swatch)


Hi! It's February. It means Valentine is coming, yay! Speaking of Valentine, what's your plan? Do you have any date to spend your Valentine with? Hahaha i wish you have one ( just one please, don't make it two, or three :p ). In this very blog post, i will write you about my Valentine Nails.
I did this on Saturday, when i was alone watching Liverpool vs Arsenal. Btw, Liverpool is my most fav football team. I have been supporting it since i was in Junior-Hi :D. And, such a bless to see Liverpool won the match. I hope they make it to the Champions League next year. 
Oh, back to the Valentine Nails. Pardon the distraction hehe. I use a very very cute nail polish my boyfie gave me. It's called O.P.I I Lily Love You ( I love you too, dear Deas :p ). Can it be any more romantic?


O.P.I I Lily Love You

The O.P.I polish is a pink transparent polish with some glitter in it. I decided to paint my nails first with The Face Shop's  PP402 ( Please don't forget to apply base coat on your nails before you apply any nail polish on it ) before applying the O.P.I's I Lily Love You.  It is a shocking pink nail polish. So i guessed it would be a perfect combination when you paint the O.P.I on your Shocking Pink nails :D. And yess, it made a perfect swatch, i just couldn't stop praise the swatch. Purrrrfect!


The Face Shop's PP402 (sorry for the bad resolution. I googled it)


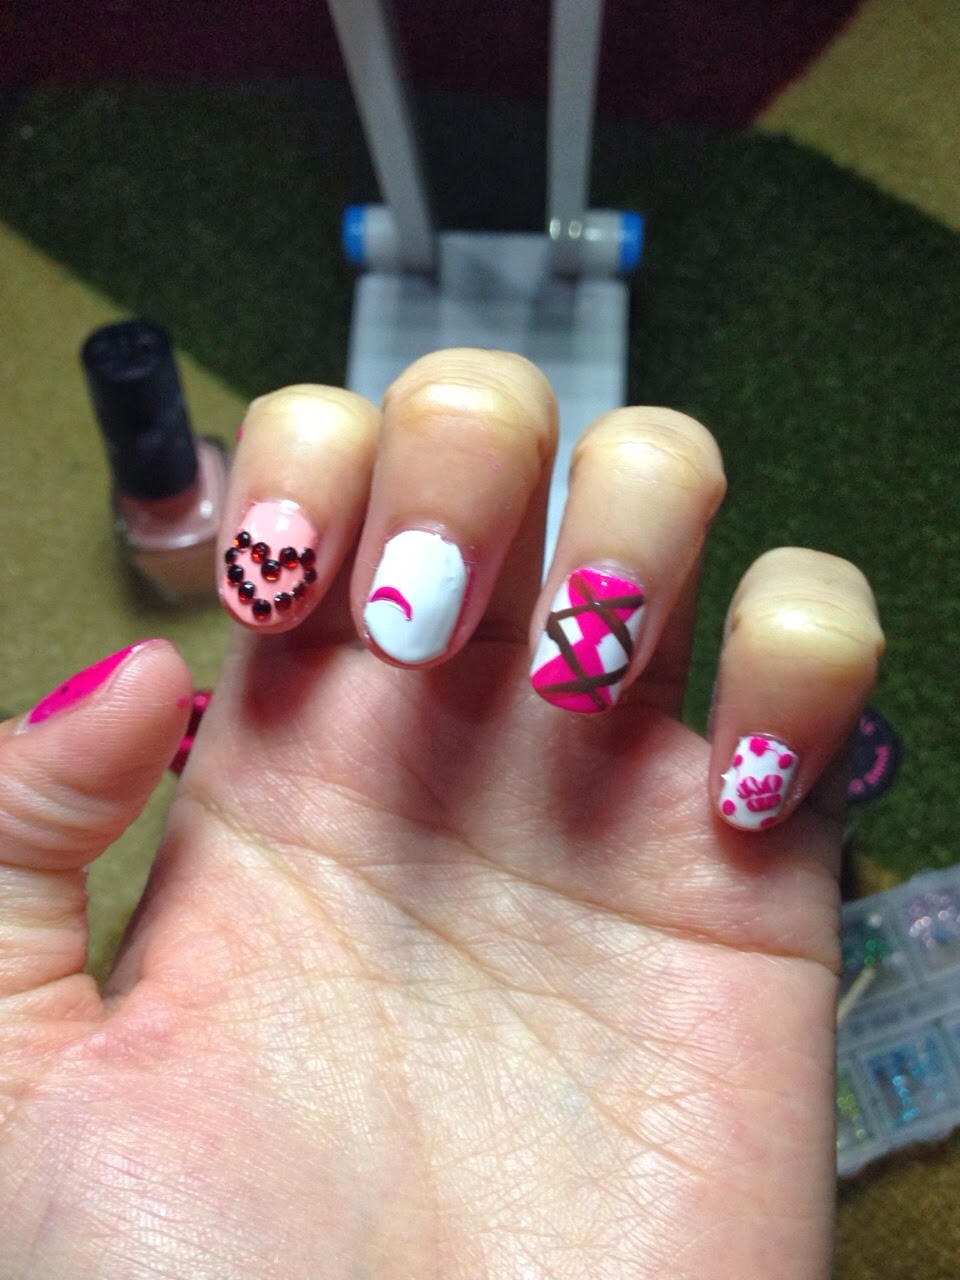
 Oh, and for the ring finger. I just made a very simple drawing on it. How? Mmm sorry, i (always) forget to capture the "step-by-step". So i guess i will write it down for you, i hope you don't mind :D. So here it is!
0. Apply base coat on your nail
1. Paint your ring finger white.
2. Draw 2 triangles, do it like you draw an hourglass or i might say, draw an hourglass (?). I use a pink polish for this one. 
3. Draw 2 X(s) after the triangles dry. You can do this by using a stripper brush or a toothpick :D. You can look at my nails (photo shown below, or at the very top of this post ) if you need example.
4. Apply top coat to give your nails extra-shine look and prevent your nail from scratches, dings, and chips
Look at my Ring Finger!
Revlon Super Top Speed Top Coat

That's it for this post. I hope you like my Valentine nails. Don't be hesitate to give your nails a Valentine look, post it on your Instagram or Twitter, and tag me @puspitanh or @inatha. Oh, for the addition, i will post my selfie(s). 

WARNING: Close this post now if you don't want to see my Narcissism!!


 Don't forget to give me your comment aaaand see you on the next post!


 Take Care,


 Ita.